Crash
-
Posts
5,718 -
Joined
-
Last visited
-
Days Won
246
Content Type
Profiles
Forums
Downloads
Gallery
Events
Articles
Everything posted by Crash
-
From Boo on the GBS forums Get the things you need Download Gimp Install a plug in that allows gimp to work with DDS files like this one https://code.google.com/archive/p/gimp-dds/ Download the official template for the aircraft(s) you want. Download the skin the skin you want to work with. (there are 2K and 4K versions so chose the one you want) Prepare the Template Open Gimp and in the "windows" header along the top click "dockable Dialogues" and select "brushes", Layers" and "Channels" Now go to File, then click open and navigate to the template (its esier if you've put it on your desk top) and click on it Click "convert" when prompted. Now turnoff all the layers by clicking the eye icon next to them in the "layers window". You will see braches in things like weathering - turning off the eye at the top of these branches will also turn off anything in them (for speed) - you can also collapse the braches for neatness. Prepare the skin you want to amend Now go back to "file" and click "open" again - this time navigate to the skin you want to alter. When prompted untick "import mip maps" and proceed. Now you will see a faded image in a new window. You will need to right click on the image in the "layers" window for and click "duplicate" layer. The active windows will always be associated with the last main window you clicked on. Now repeat Duplicate layers another two of three times. The image still wont be fully opaque so, for ease right clck on the top layer and select "merge Down" - keep doing for the other layers until you are back to kust one item again. Repeat the "duplicate layer" with this new strong layer a few more times until it appears totally solid (no grey checkerboard is showing). Repeat the merge layers down process again until you have only one layer. Import the skin to the main template right click on the skin layer you have created and and click on "layer to image size" - ive found this helps with the alignment of layers dragged over to other projects. Now left click on the layer in the layer window and drag it into the MAIN WINDOW of the skin template project you opened first of all (the one with all the layers you switched off. Ideally you want you skin at the bottom so just left click it and drag you point down to the bottom of the layers window. Edit the skin Click on the layer in the layer window Ensure that the area you want to work in is active - you can do this by pressing "R" on the keyboard and dragging a rectangle out around the area you want. Now select the colour of the paint you want to use to overpaint the swastika with - to do this press "O" on the keyboard then move the dropper that appears to the paint colour you want and left click Now select a paint tool by pressing either A for airbrush or P for paintbrush. In the Brushes window you will see a number of shapes and an bar for "spacing". Select one of the round soft edged shapes and lower the spacing amount if you want (you will see a dotted outline on the icon in the main window that will show you the size of the brush) Overpaint the area you want and repeat the colour picking and painting with other colours as you wish. If you make a mistake just press ctrl and z to undo your last action Prepare the skin for export Now you can prepare your skin for export Rick click on the layer and click on "merge Visible layers" in the pop up window select "clipped to bottom layer" - this step isn't probably necessary with just one atcie layer but is here just for completeness. Next Right click on the layer in the layer window and then select "Add layer Mask" In the window that pops up selected the bottom option "channel" and make sure that "Alpha1" is selected in the box below - now you will see the image becomes semi transparent and the grey checkerboard appears. your skin is now ready for export. Export the Skin Go to file then click on "export as" Type in the name of the skin you will know it as and make sure you end the name with .dds. This will prompt gimp to work in dds export mode. Click "export" and in the box that appears select "BC3/DXT5" in the compression level dropdown and "Generate Mipmaps" in the mipmaps box In the "Advanced" section select "Box" in the Filter Click OK to complete the export Save the template for later use FINALLY - go back to your main project template and undo the Marge visible layers and add layer mask actions (press Ctrl Z twice) and save it. This is a basic guide - it will destroy any weathering around the area you have painted but you can always but this back in by switching on the layers affected and copying them in but I wont cover that here. Careful work with the airbrush option and a small pattern should see you right though. You could replace the swastika with the default version if its in the template or even create a new layer on which to paint instead of directly onto the original skin. Whatever you do, if you publish it, credit the original artist. Cheers BOO Going to have a play with this
- 1 reply
-
- 1
-

-
More http://www.mediafire.com/file/ro79g6hvqh74nmq/P38J25_Glacier_Girl.7z/file http://www.mediafire.com/file/ne9koddwetme8bc/p38j25_pudgy_v.7z/file http://www.mediafire.com/file/7xj4ah1hu9xi5jj/hazel_zipped.7z/file http://www.mediafire.com/file/g9jpzxivvcyxzi4/dragon.7z/file
-
Have you got the TS config set to default input? maybe select the soundcard as input device in the TS settings.
-
Interesting, that Cortina would be worth a LOT of money.
-
-
Go to the menu then on the drop down select options. select the key for PTT. then select the begin test button. Not sure if TS can use joystick buttons.

-
Dave
Crash replied to Dave Milton's topic in IL-2 Sturmovik: Cliffs of Dover Blitz and Desert Wings: Tobruk
Hi, have a look here https://theairtacticalassaultgroup.com/forum/forum.php or here https://forum.il2sturmovik.com/forum/104-il-2-sturmovik-cliffs-of-dover/ -
Link was from here https://forum.il2sturmovik.com/topic/55155-p-38j-california-cutie-released/
-
Artie wanted to know if it is possible to skin, see here https://forum.il2sturmovik.com/topic/13726-quick-start-guide-to-skinning-with-gimp/ https://forum.il2sturmovik.com/topic/15420-custom-alpha-channel-tutorial-for-gimp-advanced-skinners/ https://forum.il2sturmovik.com/forum/107-4k-skins-and-templates/
-
Major Fenrirs P-38 Campaign - Testing
Crash replied to Crash's topic in IL-2 Sturmovik: Great Battles Series
Thanks Fen, maybe ask Pat for ideas? -
There are issues with overlay messing things up.
-
look in the private area ;)
-
Are now starting to be available https://btcloud.bt.com/web/app/share/view/pthsBHFuhZ?shareUid=5e5495aa161c4b4b9f31ae395eded5d4 and another https://mega.nz/#!Y2hCACTI!sF1gPgbRfyB09Zgg349Y_c-3dEkcPYaF5PY40J18HOE and another http://www.mediafire.com/file/0t0lnkpp95iacm1/P38J25_MARGE.dds/file
-
I have 3.3.2
-
New Game Launcher, New Set Up
Crash replied to DD_Arthur's topic in IL-2 Sturmovik: Great Battles Series
Collector planes annpunced Dear Pilots! It’s our great pleasure to officially announce that our next Collector Planes for the IL-2 Sturmovik: Great Battles series will be the – Yak-9, Yak-9T and the Hurricane Mk.II. Both of these aircraft, or I should probably say all three of these aircraft, were important designs that were workhorses of their day that made great contributions to the war effort on several fronts. These particular planes were chosen so we can offer an even more diverse and well-rounded plane-set that benefits primarily our Eastern Front products, which we still care deeply about and as of now, the majority of our customers own the most of. The Yak-9 came in many different flavors and it derived from the robust Yak-7b design. The Yak-9 was used over many important Eastern Front battles and was a very versatile and reliable airframe. It was the most produced Soviet fighter of the war. The famous Normandie Niemen pilots also used a variant of the Yak-9 in combat as did many successful front-line Soviet units. The Yak-9 was light and maneuverable at low altitudes and gave her pilots a real chance against the Bf-109 and Fw-190s of it’s day although it was less armed than its German adversaries. However, the Yak-9T came packing the NS37 37mm cannon in the nose which was a heavy hitter. A 37mm round can do some serious damage to not only enemy airplanes, but also vehicles and armor. Due to the bigger length of the 37mm cannon, the cockpit of the -9T had to be moved rearward about 400mm to accommodate it, slightly changing its lovely profile. The Yak-9 was an important aircraft for the Soviet Union and will make an excellent addition to the IL-2 Great Battles Series! The legendary Hurricane, which was built by Hawker, became famous in the west for winning the Battle of Britain and for the many sorties flown in the Mediterranean and North Africa theaters. However, it was also widely flown on the Eastern Front as a Lend-Lease product and saw much combat over the vast landscape of the Soviet Union. Hurricanes were one of the very first Lend Lease types to reach the Soviet Union and they were pressed into service right away as a stop-gap fighter as Soviet industry moved eastward to safer locations. It would eventually be joined or replaced by other Lend Lease designs like the Kittyhawk and Airacobra and newer Soviet designs, but the Hurricane soldiered on in many combat roles across several fronts including Stalingrad and Moscow. They were also heavily used on the Northern sectors to protect important warm water ports. Soviet ground crews also employed several weapon modifications which had a heavier punch than its original Browning machine guns. We hope to model most of these modifications. The Hurricane in Soviet service was a lengthy affair that deserves inclusion in IL-2 Great Battles. Without further delay, here are some very early Work-In-Progress renders of the Yak-9 and Hurricane in production. As is customary, Pre-Orders for these planes will commence in just a couple weeks and they will be ready for duty first half of next year. Remember, that by purchasing Collector Planes you allow us to continue to make important and interesting aircraft that we may not have been able to include in our main titles. The Sturmovik Team -
Major Fenrirs P-38 Campaign - Testing
Crash replied to Crash's topic in IL-2 Sturmovik: Great Battles Series
I might be a bit late tonight. -
Its worth it Bucky
-
Oculus needs to be running before BoX and Open composite should start instead of SteamvR
-
As I now only do VR, I use Rift as default speaker/microphone
-
Major Fenrirs P-38 Campaign - Testing
Crash replied to Crash's topic in IL-2 Sturmovik: Great Battles Series
either would do for me, maybe need to pm other pilots who might not be aware that this will happen. -
New Game Launcher, New Set Up
Crash replied to DD_Arthur's topic in IL-2 Sturmovik: Great Battles Series
more stuff 233 Hello! We continue our movement toward the release of Battle of Bodenplatte, but even near the finish line we still find opportunities to improve the entire project. This time we found a way to implement a significant optimization to part of the graphics engine that is responsible for displaying the clouds. In addition to a significant increase in FPS on existing cloud settings, this allowed us to add an additional setting for the cloud quality called "Extreme". This option is named so because it combines somewhat increased performance with a significant reduction of the “boiling” clouds effect which appears when looking sideways from the direction of movement. We have also significantly increased the clarity of cloud shapes and boundaries. Our clouds always looked nice on the high settings, but with the addition of this new option their visual quality and realism has significantly increased. However, it is better to see an example: Work on the Tank Crew project is still in full swing, and new additions can be expected in the coming months. First, at the end of October, the project acquires its main gameplay component- two Scripted Campaigns based on historical events of the Battle of Prokhorovka. Second, our next update will include new command functionality for the tank and tank the platoon commander. Third, before the end of the year, we expect our partners from DigitalForms to complete two new armored vehicles - the Soviet self-propelled artillery SU-122 and the German medium tank Panzerkampfwagen V "Panther". The 3-dimensional model of the Panther exterior is in a high degree of readiness whereas the SU-122 has already been completed and work is underway on texturing the interior and creating its crew animations: -
and this one https://forum.il2sturmovik.com/topic/54643-p-51-d-skins/?do=findComment&comment=832986
-
Who?
-
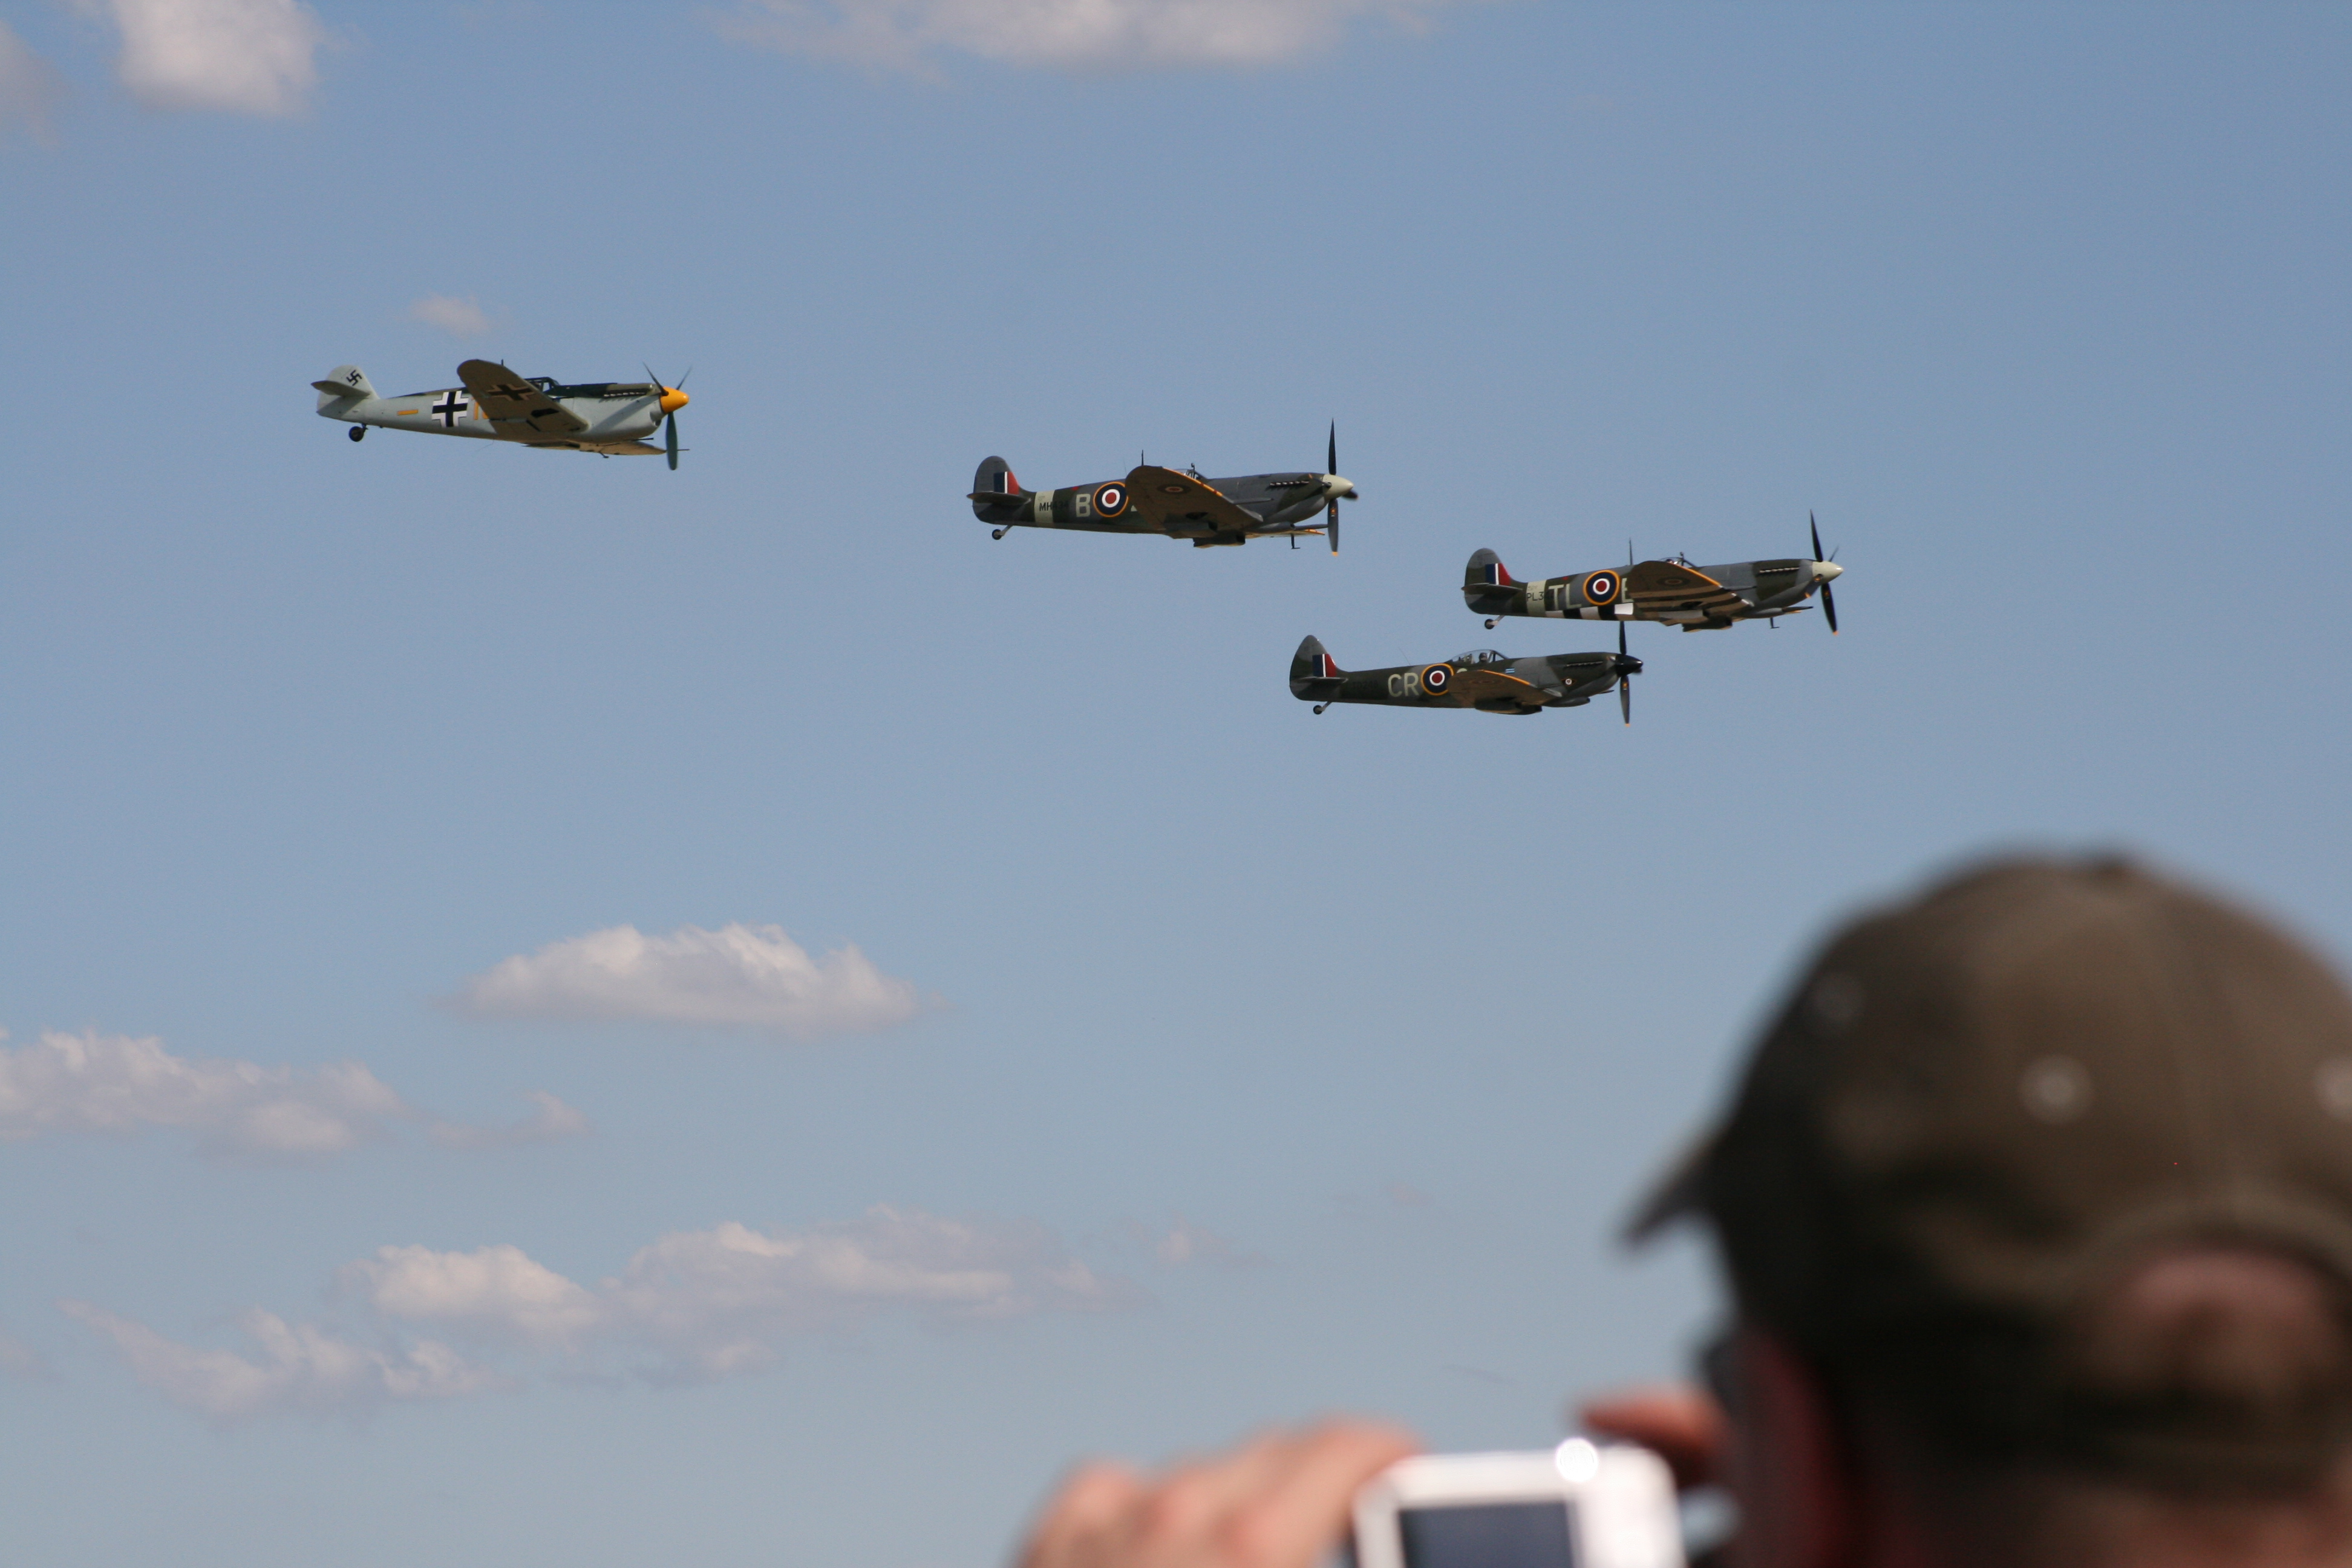
 Dux 2019 I entered this photo at the camera club and it came second
 -
From the album: Untitled Album


