


Sid
Content Type
Profiles
Forums
Downloads
Gallery
Events
Articles
Posts posted by Sid
-
-
The countdown can start.......
-
Love 'em....
 The piccies.....not the Hens! Well, maybe....
Brilliant! Was fun avoiding the security geezers in the American Museum

-
Just confirming.....that's a 8pm GMT start as Dogz time is currently 1 hour behind.
-
I've been watching this with interest all day GK.
I have had it loaded onto my hard drive since Day 1 but have run the game offline for a total of 13 hours - to be honest I didn't think it was that much but that is the Steam figure.
I haven't enjoyed it. Too many bugs and glitches and until antialiasing is sorted out I won't take it seriously. I will be flying IL2 for a loooong time yet, probably some Rise of Flight too. That looks nice and behaves itself.
Cheerzen
-
~S~ Colin m8,
I think it would have sounded better if maybe just Tom and Chris had sung it but it sure did impress that "hen" party !! LOL
~S~ Toneless.
To the point where a Hen approached me and said that they (the Hen Party) wished that they, quote "....had spent some time with you lot instead of going out. You seemed to be having fun!" unquote
I agreed, saying that we indeed had had great fun and also that it's a shame the Hens didn't join us as their presence would have enhanced our evening greatly.
The Hen suggested that she could enhance my evening greatly if I wanted.
I coyly suggested that I didn't need any enhancements as I was happy with what I had.
She laughed and playfully slapped my shoulder.
At this, we both knew what should be happening that night.
She leant toward me and said "I cant invite you back to my room, I'm in with my sister"
I said, with a cheeky wink, that's not a problem......
She giggled, and said "Your room would be fine, I'm sure" And, nodding towards a figure behind me, said "Any way your pet monkey could go elsewhere for the night....?"
I knew without turning that I was scuppered....I didn't need to look......'effin Painless....again.....
Blown out.
PS The quote is true.
-


Welcome PapaBear, good to see some maturity here....!!!
Cheerzen
-
Thanks m8, for the drill thing, I was contemplating investing in a basic Dremel sort of thing. Is this the right way to go?
Jabo
That's what I've got - it came with a few useful attachments and is easy to use.
-
Chaps, recently I've been considering picking up the paintbrush and doing a little light kit building for the first time in years. Bearing in mind that all the stuff I had disappeared years ago, what in your opinion(s) do I need to get started/essentials? Apart from a kit that is...
Oh and I want to try my hand at spraying too...
Jabo
Nice to hear you are getting into it.
This list will no doubt get added to:
Good eyesight
Steady hand
Patience
Place away from others
Modelling knives with a selection of curved and straight blades
Straignt tweezers, curved tweezers
Various grades of glasspaper
Wooden board to build on
Small hand/electric drill
Polystyrene glue, super glue, epoxy glue
cocktail sticks to apply glue
Clothes pegs to hold things together
Various sizes of elastic bands to hold things together
Lint free cloth to wipe and dry
Soap tissues to clean surfaces
A clamp that can stand alone on a surface so's you can use both hands
-
 You lucky, lucky bar steward
Well done mate! Your grin says it all......
-
No.9, U120 wasn't sunk because of a toilet malfunction, in fact she was not sunk at all.
Yes it was 'sunk' - don't take it literally. Someone or something being in a hopeless situation can be described as being sunk.
-
I agree, 4.101 until UP is stable. We use up far too much time sorting out issues rather than flying, 2-3 workable missions during an evening's co-ops isn't enough.
Dogfight server will remain UP (unless Rog decides different, of course).
-
Well done Angus...I like to see the reports of you brave self-build guys.
But, my system would boot very very slowly, the Bios part of it. Started happening after I had connected my USB devices.
And, once in Bios, the cursor/pointer/menu selector went scrolling continuously, as if the down error was pressed constantly, or the mouse was moved downwards.
Turned out it was one of my game controller devices, one that used to be a game pad, but of that I now only use its electronics for some 12 buttons.
No switches/pots are connected to the X/Y/Z axis of the controller. And that is something this Bios cannot handle. It recognizes it as some kind of USB controller and accepts its constant inputs...
Old bios never did that, but that one was much older, and did not have mouse control.
I've solved it by only connecting that specific controller whenever I do need it. And have it disconnected at boot.
Am already working on a Bodnar-board to replace that weird gamepad thing...
FT, my Belkin N52te game controller did that to my system. I had it set up beautifully for World of Tanks but In the end I got fed up with the effects and the constant plugging in and unplugging when the issues occurred.
-
Firstly and most importantly DO NOT buy the 'software' they're offering you, it's just a scam to get your bank details. The last guy I spoke to who went along with this lost £500 in minutes.
Jabo
'Effin great. I had this same 'effin popup 2 weeks ago....... I bought the effin' software......

-
Yay, thanks Gec.
 Rog
Rog -
Gents
Need to get the icons sorted out on the dogfight server Rog is running for us. Can anyone pass on the method of getting them set as:
Grey Icons (or red & blue will be OK)
Plane ID approx 2 Km
distance indicators @ .5 Km
Much appreciated.
Ta
-
Done. Good luck to them, in the competition and for the future.
Cheerzen
-
Go for it C_G, I've been using the 64-bit version of 7 since the Release Client waaaay back and I honestly believe it's tbe best thing MS have done in a long time.
Jabo
Same here, and I agree wholeheartedly, best M$ product in a long time.
As a user of OS X (work), some of the features of Win7 seemed, hmmm... somehow familiar, but very welcome all the same!
You won't look back mate.

-
Tonar, the 90% loading freeze is a RAM and texture issue. Try setting 'TexCompress=2' under the [Render_OpenGL] section in your conf.ini, it worked for Sweper and Painless, might help you too.
That worked for me last night
First time I've had issues like that.WTFO!
I get this every time I try and Join a UO3.0 server.
Frustrated with Frackin mods cutting into what DD time I have left

I'll be in a UKded server
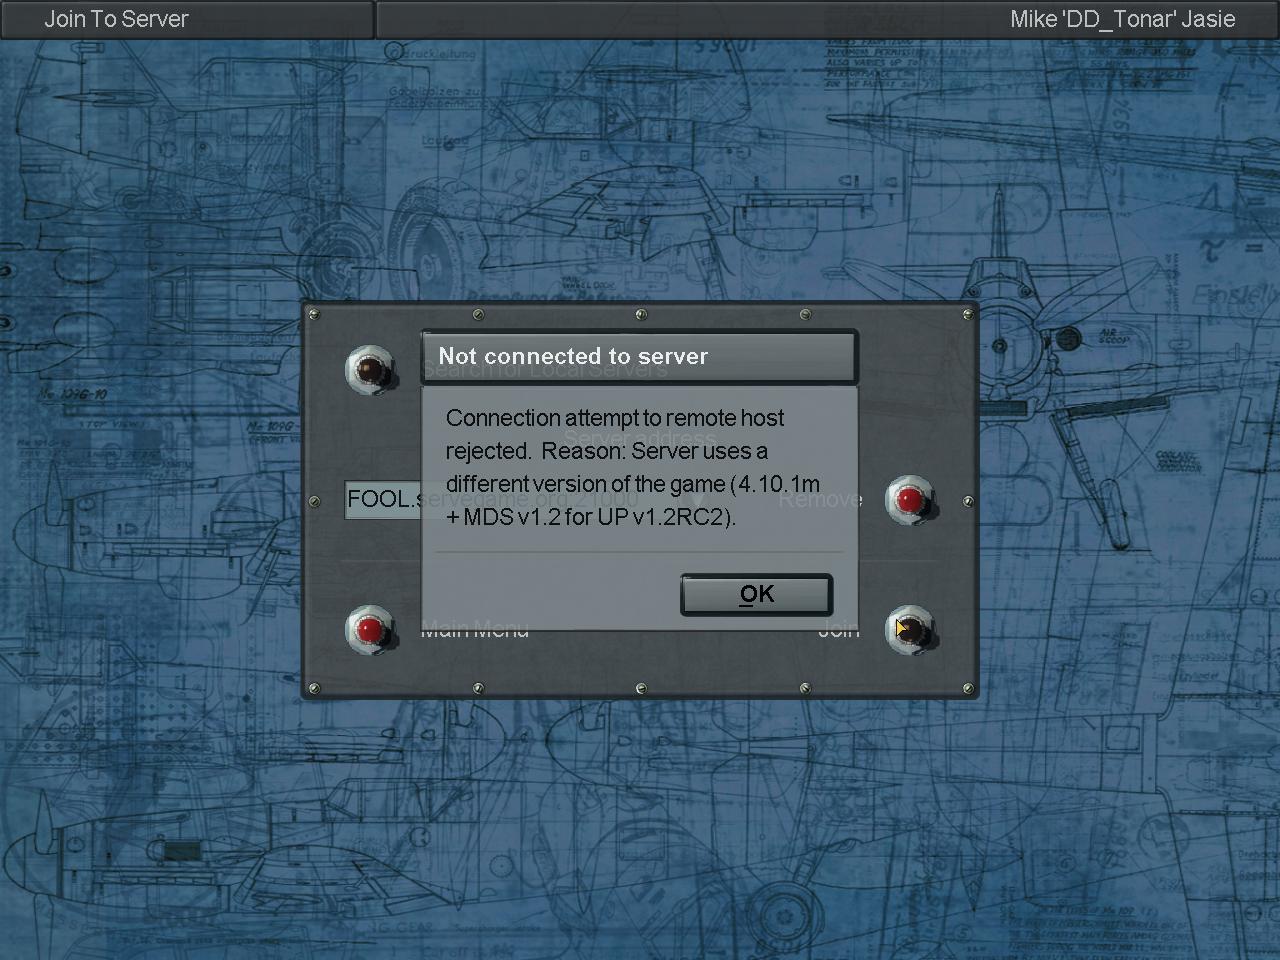
I get this when trying to log into the Dangerdogz server. Rog, is it something that needs sorting on the server end?
-
Just installed the hotfix (at least I think I did). Now how can I tell if it's working.
Me too. Installed it to the basic il2 folder containing the game just like most other stuff. Was not prompted to replace any existing files, so I have no idea if I did it right or not.
Double click on the JSGME icon on your desktop. Hover your mouse over the '#UP#_Enable_UP3.0' mod. A text box appears and should say 'Activates UP3.0 RC2 Version of game.'. If it doesn't say RC2 then it hasn't updated it.
Cheerzen
-
Thanks Mick
Jabo
And again Nick - I hadn't picked up on a couple of those updates
-
Yes, that's DEFINATELY Painless....I know it is......apparently he dumped her and she was threatening to jump.
-
Gorgeeeous!
-
So, when you fill those gaps, do you use model putty and tape them off first?
I tried using model putty last winter on a submarine for the first time. Couldn't find any videos or tutorials... what a mess.. I thought it would be soft for a day or so, but it's like a rock now and all over the place. I didn't know you should tape off the area.. So, that model went on the shelf till I got the energy to sand it (and I'm sure lot's of rivits) off.. argg..
For painting, do you use an airbrush?
I use Milliput , an epoxy putty. It can get messy but one of it's advantages is that you can use plenty of water to smooth it and shape it when applying it. On a wing root, for example, where there is a long thin gap between the wing and the fuselage, I'll roll out a very thin 'sausage' of putty to the length of the gap. I run a very small amount of water into the gap and press the putty in, smoothing it over with my finger making sure it was a little wet before otherwise the putty will stick and pull out. Doing it this way I haven't found the need to tape off although I could see the advantage of that in some places. When it goes off it is fairly easy to sand and shape.
Airbrush.....ooeeerrrr. I have an airbrush but it has stayed in it's box. I can't seem to get on with them, I create globs of paint and spatter paint everywhere. The last time I used it the top popped off the paint reservoir when I let the air through. Covered the freezer with orange paint - managed to get it off before the missus got home

I stick to brushes or use the Humbrol spray cans or an equivalent, I can handle those easily and you can get most colours represented.
Once I've finished the camo scheme I spray the model with gloss varnish - if the paint was gloss I leave it. This is to help when applying the decals, they slide better on gloss surfaces and it also gets rid of any transparent film in or around the decal that appears to stay when putting them onto a matt finish. There are other products that do the same thing so it's a case of finding something you are happy with. To finish the paint off I then spray a matt, satin or gloss varnish - this gives the right effect and also makes the decals look painted on.
-
Looking the biz Sid. But did you say you're going to fill in the gap in the wing roots after you spray it?
 Or did I misread that?
Yes, I fill in the gaps after a base coat is applied. At the moment the model is shiny and quite pale - giving it an undercoat of mid grey makes it easier to see gaps, the pale coloured filler shows up better when applying it and because it's a matt undercoat the overall contrast is better so making the model 'cleaner' and easier to 'see' areas that need attention. Sounds a bit
I know, but it works for me  .
. I do grey undercoat like this on all planes irrespective of the finished colour scheme, although I have used lighter grey on pale schemes. If there is only a small amount of filler and sanding needed then I won't bother spraying over the filler with the grey undercoat again, I'll just go straight onto the colour scheme. On this model, the undersides will be black - a grey undercoat reduces the possible number of coats over a pale surface and can help in giving a weathered finish.
More Start Up Woes
in Help!!
Posted
~S~ mate!
Fully understand your problem, but still missed you tonight
Look out for a Youtube vid that BluBear is hoping to get up tonight.
Cheerzen