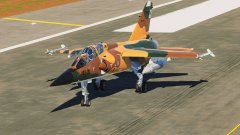
Rattler Posted June 22, 2007 Report Share Posted June 22, 2007 Picked up a Monogram Promodeler 1/32 scale Me-109 G4 Trop for 10$. [attachthumb=1] I'll be posting pics as the kit progresses... Quote Link to comment Share on other sites More sharing options...
GreyKnight Posted June 22, 2007 Report Share Posted June 22, 2007 Oooh! Nice one Rattler, show us the pix asap! I'm after doing a Bf-109 G2 1/48 myself. IF I can ever get one. They're like rockin' horse . I was looking at this a couple of days ago, well impressive http://modelingmadness.com/scotts/axis/ ... 9/24g6.htm At that scale, I guess there are A LOT of details on that plane of yours too. Quote Link to comment Share on other sites More sharing options...
Shadow Posted June 22, 2007 Report Share Posted June 22, 2007 I remember way back when... For my 14th birthday, the folks got me a 1/24th scale Revell Spit and a 109. They built up real nice for those days. I'd love to find the pair again and have another go at it. Looking forward to seeing how your build progresses Quote Link to comment Share on other sites More sharing options...
GreyKnight Posted June 22, 2007 Report Share Posted June 22, 2007 Here's a good link to nearly all the 109 models... http://modelingmadness.com/scotts/109s/109gallery.htm Quote Link to comment Share on other sites More sharing options...
delta7 Posted June 22, 2007 Report Share Posted June 22, 2007 Im still pluggin away with my hasegawa 1/48th hartman 109k but Im not really happy with the kit-it got rave reviews but some of the fit wasnt great and the surface doesnt stand up to sanding well, the revell spitfire kit was much better Trying to get the flaps and radiator to sit in down position is a major pain- the contact area is very thin and they keep coming off. To cap it all I was starting the paint job yesterday. It started off very well , I thinned the paint and it went on very nice- then I tried to touch up a minor flaw and the shade had changed and it was a bit thicker so it looked shit- so I took all the paint off and the thinner loosend the glue on the flaps and rads so they fell off along with some other minor fiddly parts- AAAAAAAAARRRRRRRRRRRRRGGGGGGGGGGGGGG it was very close to being thrown in the bin but I worked on it again and everything is back on so Ill be back to painting it next week Quote Link to comment Share on other sites More sharing options...
GreyKnight Posted June 22, 2007 Report Share Posted June 22, 2007 Keep plugging away Delta7 and show us some pix too. Quote Link to comment Share on other sites More sharing options...
1. DDz Quorum Painless Posted June 22, 2007 1. DDz Quorum Report Share Posted June 22, 2007 ~S~ Dave, if it was easy we could take no pride in our creations M8 ! LOL Keep at it. Looking forward to seeing the pics. ~S~ Painless Quote Link to comment Share on other sites More sharing options...
Rattler Posted June 22, 2007 Author Report Share Posted June 22, 2007 Here's pics of the base coat interior. Details to be done soon - when report cards are done! [attachthumb=1] [attachthumb=2] [attachthumb=3] [attachthumb=4] [attachthumb=5] [attachthumb=6] [attachthumb=7] Quote Link to comment Share on other sites More sharing options...
GreyKnight Posted June 22, 2007 Report Share Posted June 22, 2007 Wow, look at that detail on the rudder pedals. And is that a trim wheel next to the seat? That looks cool too. Okay hurry up and finish it NOW! Quote Link to comment Share on other sites More sharing options...
Rattler Posted June 22, 2007 Author Report Share Posted June 22, 2007 Wow, look at that detail on the rudder pedals. And is that a trim wheel next to the seat? That looks cool too. Okay hurry up and finish it NOW! Quote Link to comment Share on other sites More sharing options...
Streak Posted June 22, 2007 Report Share Posted June 22, 2007 I haven't built a model in many years. Then it's ironic seeing this thread because I just picked-up some models to put together as a family night project. We've got a 1967 Ford Mustang (the wife's dream car), an ME-163 Komet & an La-7. Finished getting paints ext. we needed, now we just have to get started on them. Quote Link to comment Share on other sites More sharing options...
Rattler Posted June 22, 2007 Author Report Share Posted June 22, 2007 I'm also doing a 1/48 P-61 Black Widow, and a 1/24 1968 Hertz Rent-a-car Mustang GT-350. Quote Link to comment Share on other sites More sharing options...
1. DDz Quorum Painless Posted June 22, 2007 1. DDz Quorum Report Share Posted June 22, 2007 ~S~ Rattler, I love cockpit detail, its best when they "raise" the instrument detail so you can dry brush it don't you think ? Are you going to scratch build some "fag butts" ,(English version), to put in the ashtray ? Quote Link to comment Share on other sites More sharing options...
Rattler Posted June 22, 2007 Author Report Share Posted June 22, 2007 For the instrument panel, I'm going to do what another guy did - cut out the individual guages and micro-sol them down over the raised details. It looks really sharp! [attachthumb=1] Quote Link to comment Share on other sites More sharing options...
delta7 Posted July 8, 2007 Report Share Posted July 8, 2007 wip pictures from my 109 Quote Link to comment Share on other sites More sharing options...
GreyKnight Posted July 8, 2007 Report Share Posted July 8, 2007 Looking good so far Delta7. But I didn't know Hartmann flew a K4. You learn something new everyday. Quote Link to comment Share on other sites More sharing options...
delta7 Posted July 8, 2007 Report Share Posted July 8, 2007 according to what I have read he did have one but didnt fly it much , he preferred his last G10 which he said was the fastest 109 he had flown Quote Link to comment Share on other sites More sharing options...
Rattler Posted July 8, 2007 Author Report Share Posted July 8, 2007 For the instrument panel, I'm going to do what another guy did - cut out the individual guages and micro-sol them down over the raised details. It looks really sharp! [attachthumb=1] Well, the decal solvent didn't work out so well. Quote Link to comment Share on other sites More sharing options...
delta7 Posted July 10, 2007 Report Share Posted July 10, 2007 well the 109 has a strong chance of ending in the bucket I Quote Link to comment Share on other sites More sharing options...
Streak Posted July 10, 2007 Report Share Posted July 10, 2007 It's going to be alright. :pysch_couch: Step back......take a deep cleansing breath........exhale & light the fuse on the big firecracker you put inside it. Any remaining larger pieces can be dealt with using a bat. This is Dr. Streaks official prescription for fixing most frustrating situations in life. Quote Link to comment Share on other sites More sharing options...
1. DDz Quorum B16Enk Posted July 10, 2007 1. DDz Quorum Report Share Posted July 10, 2007 It's going to be alright. :pysch_couch: Step back......take a deep cleansing breath........exhale & light the fuse on the big firecracker you put inside it. Any remaining larger pieces can be dealt with using a bat. This is Dr. Streaks official prescription for fixing most frustrating situations in life. Wow...I must try that method on the ex-wife! Quote Link to comment Share on other sites More sharing options...
Tonar Posted July 10, 2007 Report Share Posted July 10, 2007 Make sure you vidoe tape it. Quote Link to comment Share on other sites More sharing options...
Rattler Posted July 10, 2007 Author Report Share Posted July 10, 2007 Keep at it mate. Quote Link to comment Share on other sites More sharing options...
JensenPark Posted July 10, 2007 Report Share Posted July 10, 2007 I like Enforcer's models better. [editted] please keep your remarks to a scale model nature....granola-muncher. Quote Link to comment Share on other sites More sharing options...
delta7 Posted July 14, 2007 Report Share Posted July 14, 2007 PHEW - its been saved - used toothpaste to remove glue from canopy then klear floor polish to shine it up and looks fine now http://www.ipmsstockholm.org/magazine/2 ... nopies.htm klear also makes a good varnish to protect the model and so Iv coated it with this and started the decals- they take very nicely on top of this finish the cockpit that fell of fhas been trimmed and fitted with the help of bluetac - this took around 3 hours of work to get it to sit right im working on the decals now and then some weathering - Im going to use a spounge and silver paint for this - Iv seen pictures of this and it works nice, Ill emphasise the panel lines with pencil and then put the final varnish on and that should be it.- probably take around 2 weeks due to work etc Quote Link to comment Share on other sites More sharing options...


Recommended Posts
Join the conversation
You can post now and register later. If you have an account, sign in now to post with your account.